Import Data
This function imports your QuickBooks and Return Preparation Payment Information files into Drake Software. Go to Tools > File Maintenance > Import Data.
Before QuickBook files can be imported into Drake, they must be exported from QuickBooks.
Exporting Files From QuickBooks
- In QuickBooks, open the customer to or from whom you want to export information.
- Select the Reports tab; select Accountant & Taxes option; select Income Tax Summary.
- Once the report is on the screen, go to the Modify Report tab. Click Advanced.
- Under the Display Rows tab, click All. Click OK.
- Select the Print tab above the report.
- Click File.
- Ensure the selection says ASCII Text File. Press ENTER.
- Input a unique file name, such as ABC TAX SUMMARY.
- Save the file. The file is normally saved in the following subdirectory: C:\Program Files\Intuit\QuickBooks Pro\
Importing QuickBooks Files into Drake Software
IMPORTANT: Always backup the Drake Data files before importing from QuickBooks files.
- Select Tools > File Maintenance > Import Data.
- Choose QuickBooks Financial and Accounting Software, then click Next.
- The Instructions screen appears, click Next.
- Step 1. Import File Name – Use the Browse button to locate the file to be imported. Refer to step 9 above for file name and location.
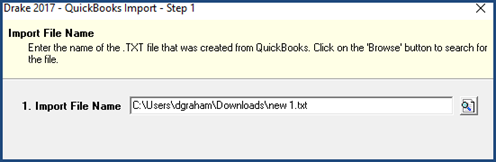
- Select the file to be imported, click OK.
- Step 2. Enter the SSN/EIN for the client. This number is used in Drake Software to reference the tax return.
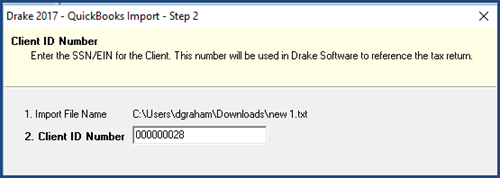
- Click Next.
- Step 3. shows the Business Type. If the business type has multiple options you are presented with drop list.
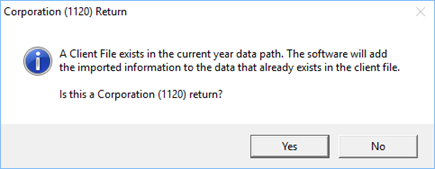
- Click Yes. The QuickBooks Import – Step 4. window appears.
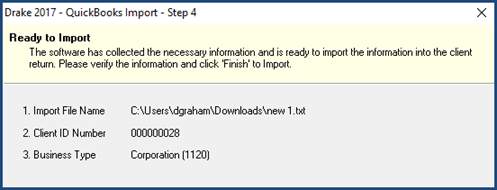
- Review the information in the window.
- Click Back to correct any information or Finish to begin the import process. The import process should occur quickly. When done the data entry screen opens.
Return Preparation Payment Information
- Go to Tools > File Maintenance > Import Data.
- Choose Return Preparation Payment Information (Excel, CSV, Tab Delimited), then click Next.
- The Instructions screen appears showing a sample of an Excel spreadsheet, click Next.
- Step 1. Import File Name – Use the Browse button to locate the file to be imported.
- Step 2. Choose the Starting Row. Notice that Step 1 now shows the name of the spreadsheet that was imported.
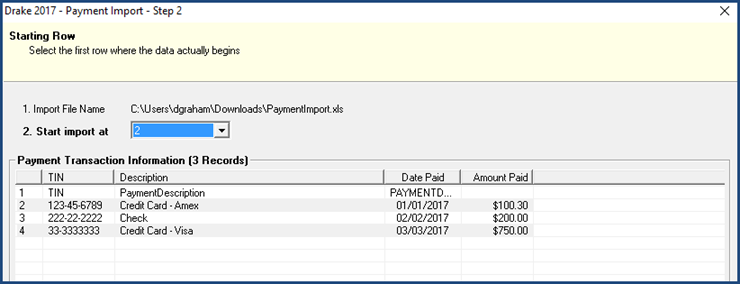
- In the example above the data begins at row 2; the first row has the header data.
- Click Next.
- Step 3. The file is Ready to Import.
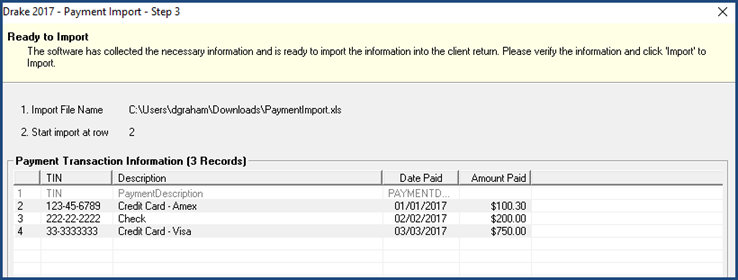
- Click Import.
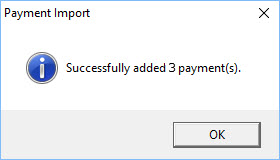
- The Payment Import screen indicates the import was successful.
Return Preparation Payment Information - Manual Entry
- Go to Tools > File Maintenance > Data Import.
- Choose Return Preparation Payment Information (Manual Entry), then click Next.
- The Instructions screen appears, click Next.
- The Apply Payment screen appears.
- Type in an SSN/EIN number. (1)
- Type in a Description. (2)
- The date automatically is set to the system date. You may change the date. (3)
- Type in the amount of the Payment. (4)
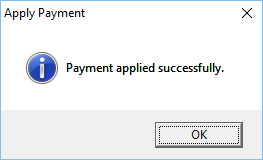
- Click Save. (5)

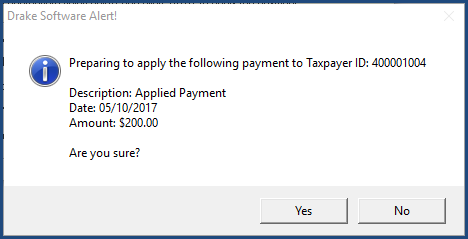
- Drake Software Alert appears. Choose Yes or No.
- The Apply Payment screen indicating a successful payment.