Customizable Organizers
Customize the organizer "Checklist" or create a custom "Questionnaire" with the Custom Editor,
The Checklist is built around preset "Standard" items (Text, Group, and Checkbox). You can edit those items, add more items, and delete any you don't need.
The Questionnaire allows you to build your own custom questionnaire to send to your clients with a list of items you want them to produce or specific questions you want answered.
Parts of the Editor
The Custom Editor consists of a toolbar at the top and a group of boxes or "panes" beneath. In the left-most pane contains items that appear in the selected document - either the Checklist or Questionnaire. The items are displayed in a forms "tree"; click an arrow to the left of the item to display a list of forms and other items nested underneath.
On the right side of the Custom Editor window are four smaller panes: a How to Use pane, a Selected Item Details pane, an Available Items pane, and a Deleted Items pane.
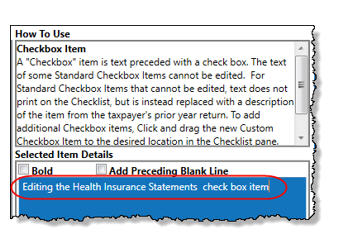
When you make a selection from the pane on the left, a brief description of the type of item you selected and how the item will appear in the Checklist or Questionnaire is displayed in the How to Use pane. The item selected on the left side also appears in the Selected Item Details pane on the right.
Editing Items
From the two check boxes in the Selected Item Details pane, select to display the chosen item in bold text and to add a space just above the item. To edit or add text to the selected item, click anywhere within the item in the Selected Item Details pane and begin typing. Press Delete or Backspace to remove text. Press Tab to complete the changes to the item in the Checklist pane.
(NOTE: “Standard Checkbox Items” that print data from the prior year’s return cannot be edited.)
Adding Items
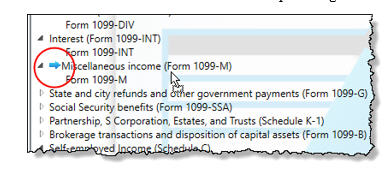
To add an item (Text, Group, or Checkbox), click and drag it from the Available Items pane to the desired location in the Checklist or Organizer pane on the left. As you drag the new item through the Checklist items, blue positioning arrows tell you if you are placing the dragged item above or below another item. An arrow pointing to the right (see circle in screenshot below) indicates the dragged item will become a Checkbox item under a Group heading.
Once the item is positioned, click and then edit it in the Selected Item Detail pane. Press Tab.
To remove an item from the Checklist or Organizer pane, drag it to the Deleted Items pane.
Click Preview from the toolbar to see how your changes look on the checklist.
Available Items
The following items are available for inclusion in the Checklist:
- Standard Text Items: The only default Standard Text Item is the introductory paragraph at the top of the Checklist. A Standard Text Item does not include a check box.
- Standard Group Items: By default, a “Group” item heading is bold with a blank line above the text. (NOTE: A Group item might have another Group item beneath.) Nested beneath the Group heading are all the Checkbox items listed as part of that group. Neither the Group heading nor any of the Checkbox items beneath the heading are generated with the Checklist if the taxpayer’s prior-year return did not include any of the checkbox items.
- Standard Checkbox Items: Checkbox items are displayed with a check box. The text of some Standard Checkbox Items cannot be edited. Custom Checkbox Items, added to a Standard Group Item, can be edited. Click and drag a new Custom Checkbox Item to beneath the proper Group heading. You will know the new Checklist item is “nested” beneath the heading when the blue positioning arrow points to the right as you drag it.
Custom Items
Click and drag any of the custom items from the Available Items pane into the Checklist or Questionnaire pane. Drag and place these items into the checklist anywhere you wish and edit the titles and text as needed. Place Custom Checkbox Items (nested) beneath a Custom Group Items heading. (The blue position arrow will be pointed to the right.)
To add a line of custom text to the checklist, drag Custom Text_________ from the Available Items list to the pane on the left. Then, from the pane to the left, select Custom Text_________, which, in turn, puts Custom Text_________ in the Selected Item Details pane. Edit the label, “Custom Text,” as needed.
Any items in the checklist you wish to delete, click and drag them to the Delete Items pane on the lower right.
You can rearrange the items in the checklist by clicking and dragging.
Click Preview to see how the new text and blank line will appear in the printed version of the Checklist or Questionnaire.
Toolbar
In addition to the Open and Preview icons on the toolbar are the Save, Restore, Empty Trash, Program Help, and Exit icons.
Although the program automatically saves your work upon exiting, you can safeguard your changes by saving your work periodically. Click Save.
Restore the Checklist or Questionnaire to its original state (as shipped) by clicking the Restore icon.
Remove items from the Deleted Items pane by clicking Empty Trash. These items cannot be recovered.
Click the arrow to the right of Program Help to view a video tutorial.
When you click Exit, all the changes you made are saved automatically. To exit without saving your work, click the arrow beside the Exit button and select Exit without save.
Adding a Questionnaire
To build your own custom Questionnaire, click the arrow beside the Open button on the toolbar and select Questionnaire.
From the Available Items pane on the right side, drag items into the large pane on the left. The choices include “Yes/No” check boxes, Custom Text Items, Custom Group Items, Custom Checkbox Items (a single check box followed by text), Custom Double Checkbox Items, and Custom Text.